
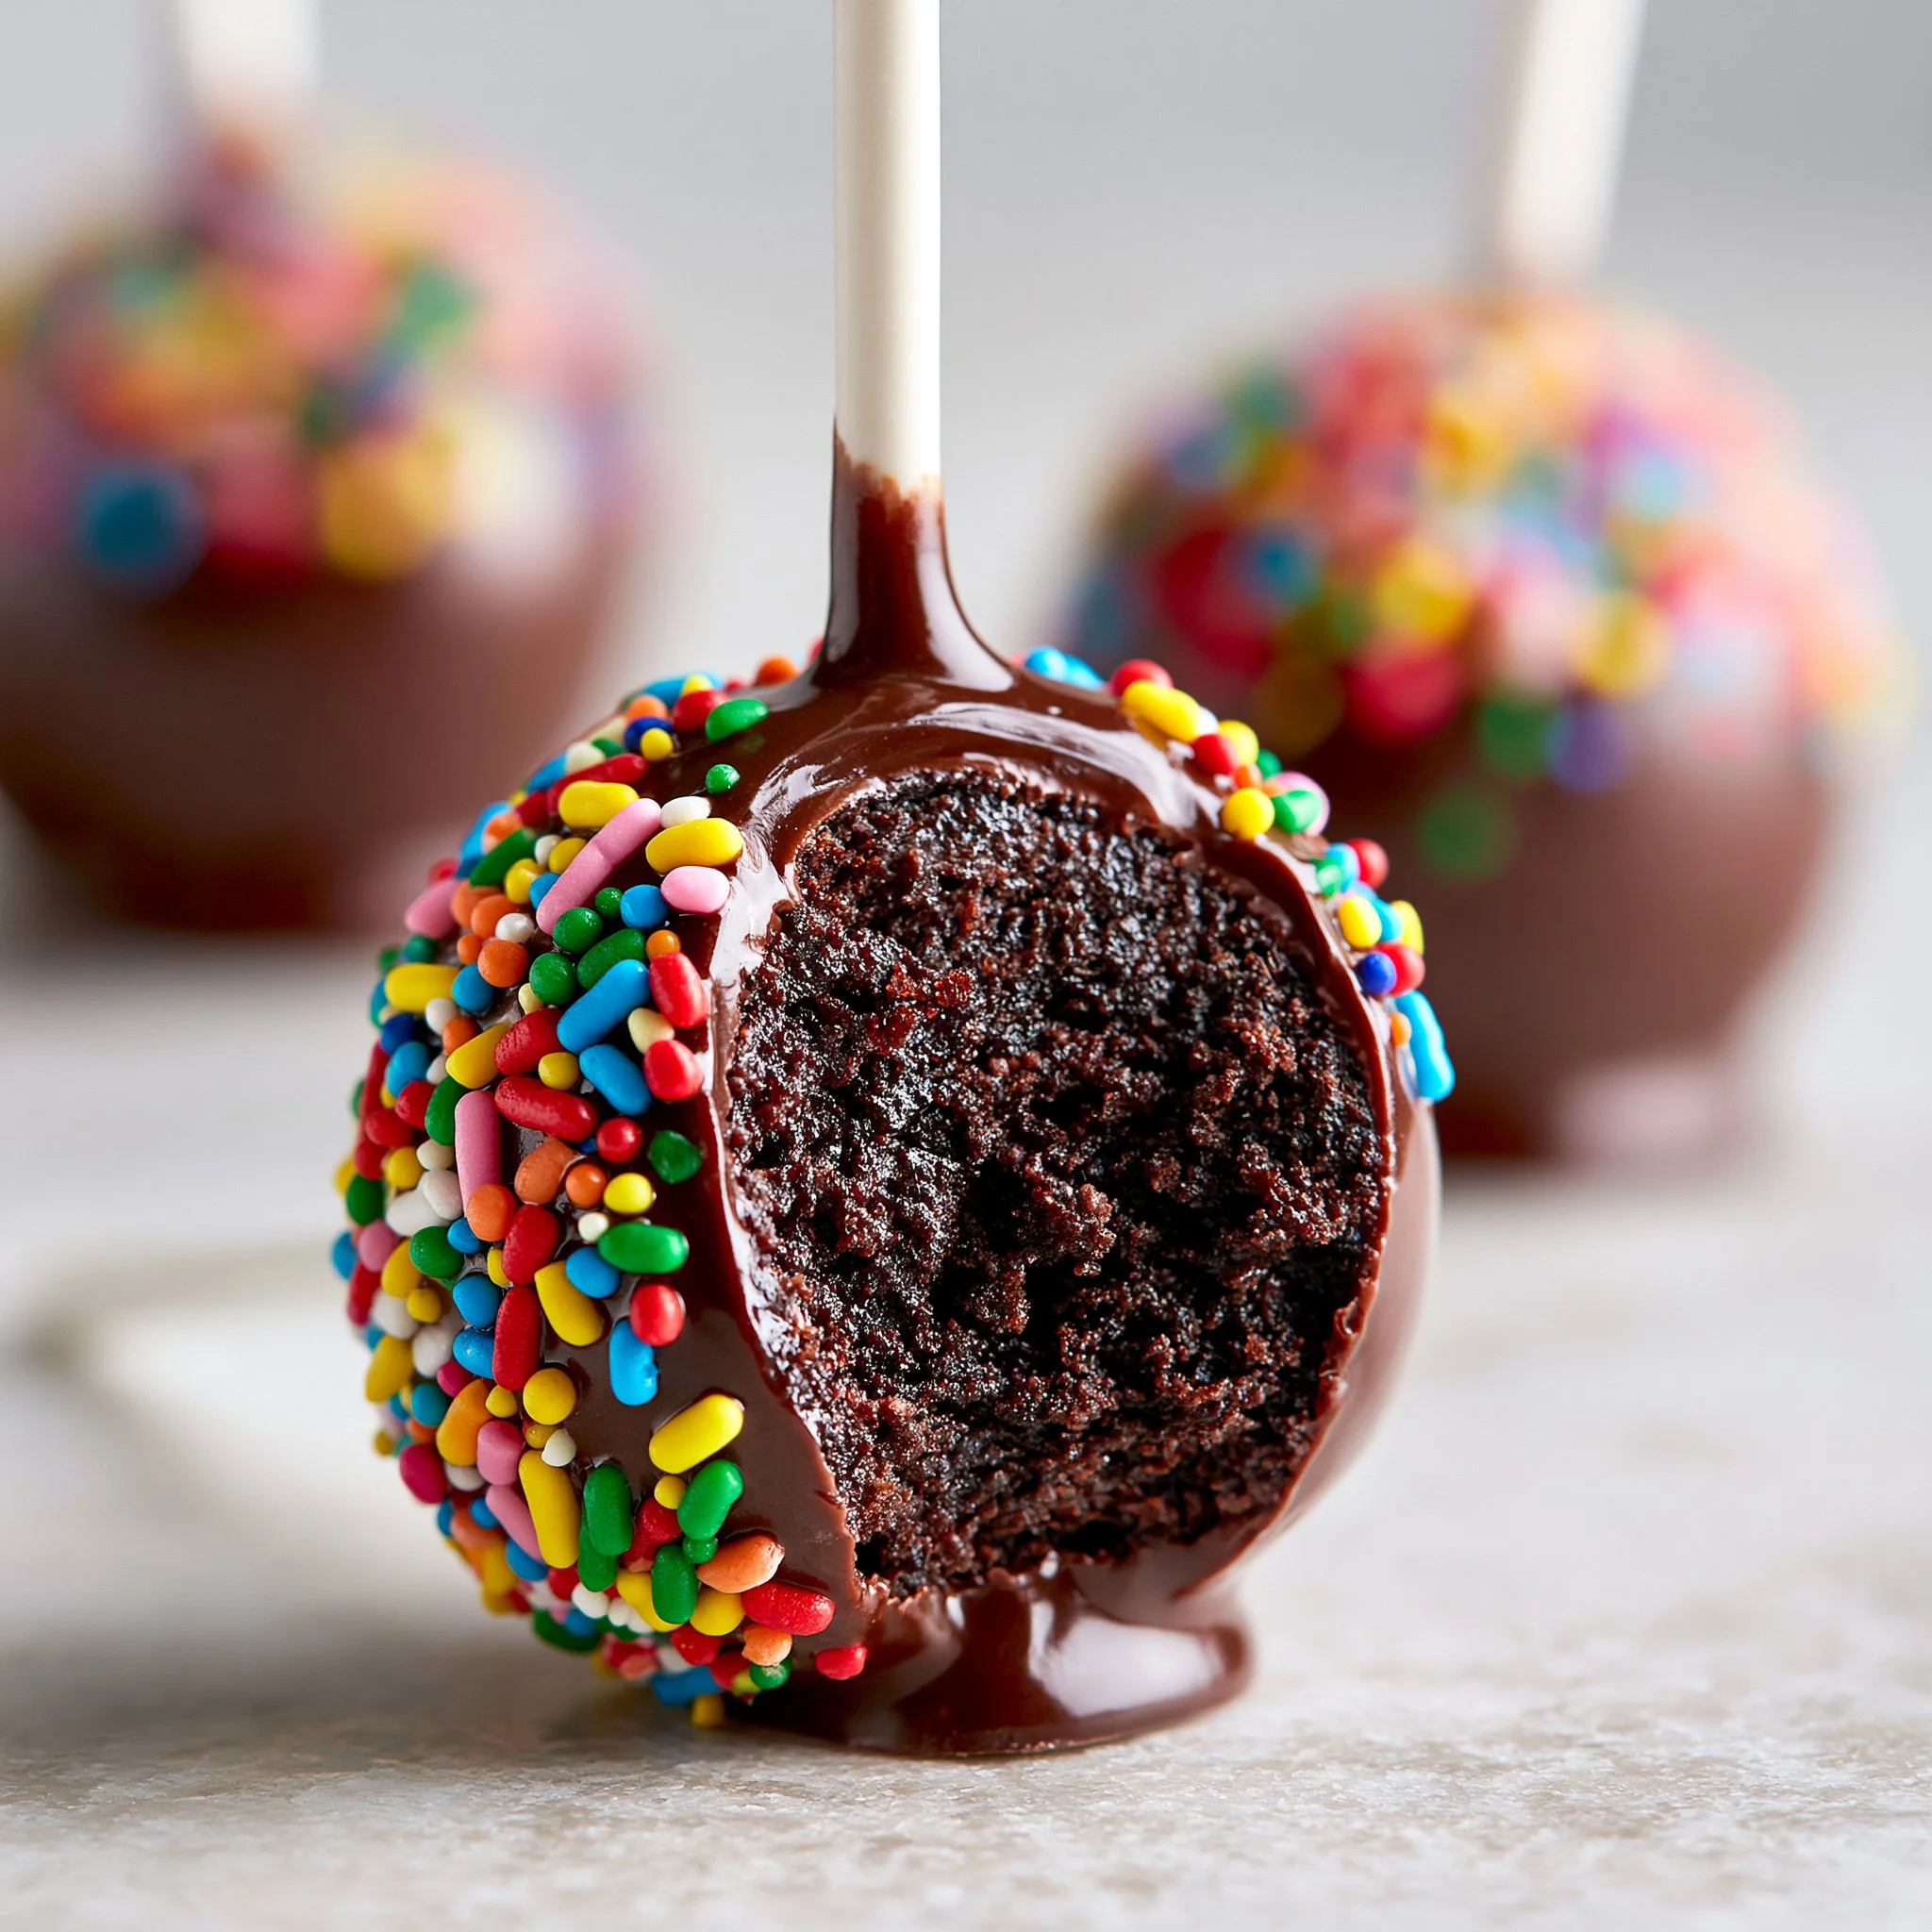
Brownie cake pops are the kind of treat that looks bakery-fancy, but the process is wonderfully hands-on and simple: bake a pan of brownies, crumble them, stir in frosting, then dip and decorate. The payoff is a fudgy brownie center that stays soft and truffle-like, wrapped in a crisp candy shell that snaps when you bite in.
I reach for these when I want something tidy and shareable—no plates, no forks, no slicing. If you’re already a fan of quick comfort bakes like my small-batch pancakes, you’ll love how straightforward this is, just with a glossy candy-coated finish and sprinkles if you’re feeling festive.
Why You’ll Love This Recipe
- Fudgy-meets-creamy texture: Crumbled brownies plus ½ cup frosting turns into a dough that eats like a dense brownie truffle.
- Candy shell “snap”: The candy melts set into a smooth coating that gives a clean bite against the soft center.
- Beginner-friendly dipping: The trick of dipping the stick in melted candy first helps the pop stay put once chilled.
- Make-ahead friendly: A full 1-hour chill firms the pops so dipping is less messy and the coating sets neatly.
- Easy to customize the look: Swap candy melt colors and finish with sprinkles for instant theme matching—no extra flavor engineering needed.
The Story Behind This Recipe
I started making these when I needed a dessert that traveled well and didn’t require cutting or serving tools—just a box brownie mix, a spoon, and a little patience while the pops chill. The frosting step is the quiet hero here: it turns ordinary brownie crumbs into something you can roll, dip, and decorate without fighting a crumbly mess.
What It Tastes Like
Think deep chocolate brownie flavor (especially when you smell that freshly baked pan cooling) with an extra layer of sweetness from the frosting-bound center. The outside is smooth and candy-sweet, and the contrast is what makes them so satisfying: a firm, glossy coating around a soft, rich, slightly sticky brownie “dough” that melts as you chew.
Ingredients You’ll Need
The ingredient list is short, but each piece does a job. The box brownie mix bakes up the base, the eggs give structure so the crumbs aren’t sandy, and the frosting binds everything into a rollable mixture (start mixing and you’ll feel it turn from loose crumbs to a cohesive dough). Candy melts create that clean, professional-looking shell—choose any color/flavor you like—and sprinkles are optional but fun for hiding any little drips or giving a finished look.
- 1 box brownie mix (for an 8×8 inch pan)
- 2 large eggs
- 1/2 cup frosting (store-bought or homemade)
- 1 cup candy melts (any color/flavor)
- Sprinkles (optional)
How to Make Decadent Brownie Cake Pops
- Bake the brownies. Preheat your oven according to the brownie mix package directions. Grease an 8×8-inch pan, mix the batter following the box instructions (including the 2 eggs), and bake as directed. You’re looking for a set top and a baked brownie (not raw batter in the center).
- Cool completely. Let the brownies cool all the way to room temperature. This matters—warm brownies will turn gummy when you try to crumble and mix.
- Crumble into fine pieces. Break the cooled brownies into a mixing bowl and crumble with your hands until there are no big chunks. Aim for an even, damp-crumb texture so the frosting blends in smoothly.
- Mix in the frosting. Add ½ cup frosting and stir until the mixture becomes cohesive and dough-like. It should hold together when you squeeze a handful; if it still looks loose and crumbly, keep mixing a bit longer (the frosting needs time to coat the crumbs).
- Roll into balls. Roll the mixture into about 1-inch balls and set them on parchment paper. They should feel compact and smooth—if they crack, press and re-roll.
- Melt the candy melts. Melt the candy melts according to the package instructions until smooth. You want them fluid enough to dip, not thick and clumpy.
- Add sticks and chill. Dip the end of each lollipop stick into the melted candy, then insert it halfway into each brownie ball. Refrigerate for at least 1 hour, until the pops feel firm and stable when you gently wiggle the stick.
- Dip and decorate. Dip each chilled pop into the melted candy melts, let the excess drip off for a few seconds, and add sprinkles right away (the coating sets quickly once it starts to cool).
- Set to firm. Place the pops back on parchment and let the coating firm up completely. Once set, they’ll look glossy and feel dry to the touch.
Tips for Best Results
- Cool the brownies fully before crumbling. If they’re even slightly warm, the frosting mixes in unevenly and you’ll end up with a sticky dough that’s hard to roll cleanly.
- Crumble finely for a smoother center. Big brownie chunks create bumpy balls that show through the coating.
- Don’t skip the candy “glue” step. Dipping the stick end in melted candy helps anchor it—especially important after the 1-hour chill when the ball is firm.
- Chill until genuinely firm. If the pops still feel soft, they’re more likely to slide or crack when dipped.
- Work in a small batch while dipping. Keep the rest of the pops in the fridge so they stay firm and dip cleanly, similar to how I keep things simple and controlled when making 3-ingredient banana oatmeal pancakes—small, manageable steps make the final result neater.
Variations and Substitutions
- Candy melt colors/flavors: Use any candy melts you like—white, chocolate, or bright colors all work the same way and change the look instantly.
- Sprinkles or no sprinkles: Sprinkles are optional, but they’re great for adding crunch and covering any tiny imperfections in the coating.
- Frosting choice: Store-bought or homemade both work; choose one you enjoy eating straight, because it sweetens and softens the brownie center.
How to Serve It
Serve brownie cake pops at cool room temperature for the best texture contrast: the coating stays crisp, and the inside stays fudgy. Arrange them upright on a platter (or lay them on parchment) and mix sprinkle styles for a playful look. They pair nicely with coffee, milk, or hot chocolate—same cozy vibe as weekend breakfast favorites like a small batch of pancakes, just in dessert form.
How to Store It
- Refrigerator: Store cake pops in the fridge to keep them firm and tidy; the candy coating holds up well chilled. Let them sit out a few minutes before eating if you prefer a softer bite.
- Make-ahead: You can fully dip and set them, then refrigerate until you’re ready to serve. If you’re planning treats for a dessert spread alongside something easy like quick pantry-friendly pancakes, these are a great prep-ahead option.
- Room temperature (short time): They can sit out for serving, but if your room is warm, the candy coating can soften.
Final Thoughts
Once you make these once, the method clicks: bake, crumble, bind with frosting, chill, dip, sprinkle. The result is a neat little dessert with a fudgy center and a clean candy shell—simple ingredients, surprisingly polished payoff.
Conclusion
If you want to compare a few approaches to brownie cake pops (especially around dipping and setting), these guides are genuinely helpful: Fudgy Brownie Cake Pops: A Decadent Treat on a Stick, Brownie Cake Pops – Baked Bree, and Brownie Cake Pops – Desserts on a Dime.

Brownie Cake Pops
Ingredients
Method
- Preheat the oven according to the brownie mix package directions.
- Grease an 8x8-inch pan, mix the batter as per box instructions (including 2 eggs), and bake as directed.
- Let the brownies cool completely to room temperature.
- Crumble cooled brownies into fine pieces in a mixing bowl.
- Mix in the frosting until cohesive and dough-like.
- Roll the mixture into about 1-inch balls and set them on parchment paper.
- Melt the candy melts according to package instructions until smooth.
- Dip the end of each lollipop stick into melted candy, then insert it halfway into each brownie ball.
- Refrigerate for at least 1 hour until pops feel firm.
- Dip each chilled pop into melted candy melts, let excess drip off, and add sprinkles immediately.
- Place the pops back on parchment and allow coating to firm up completely.