
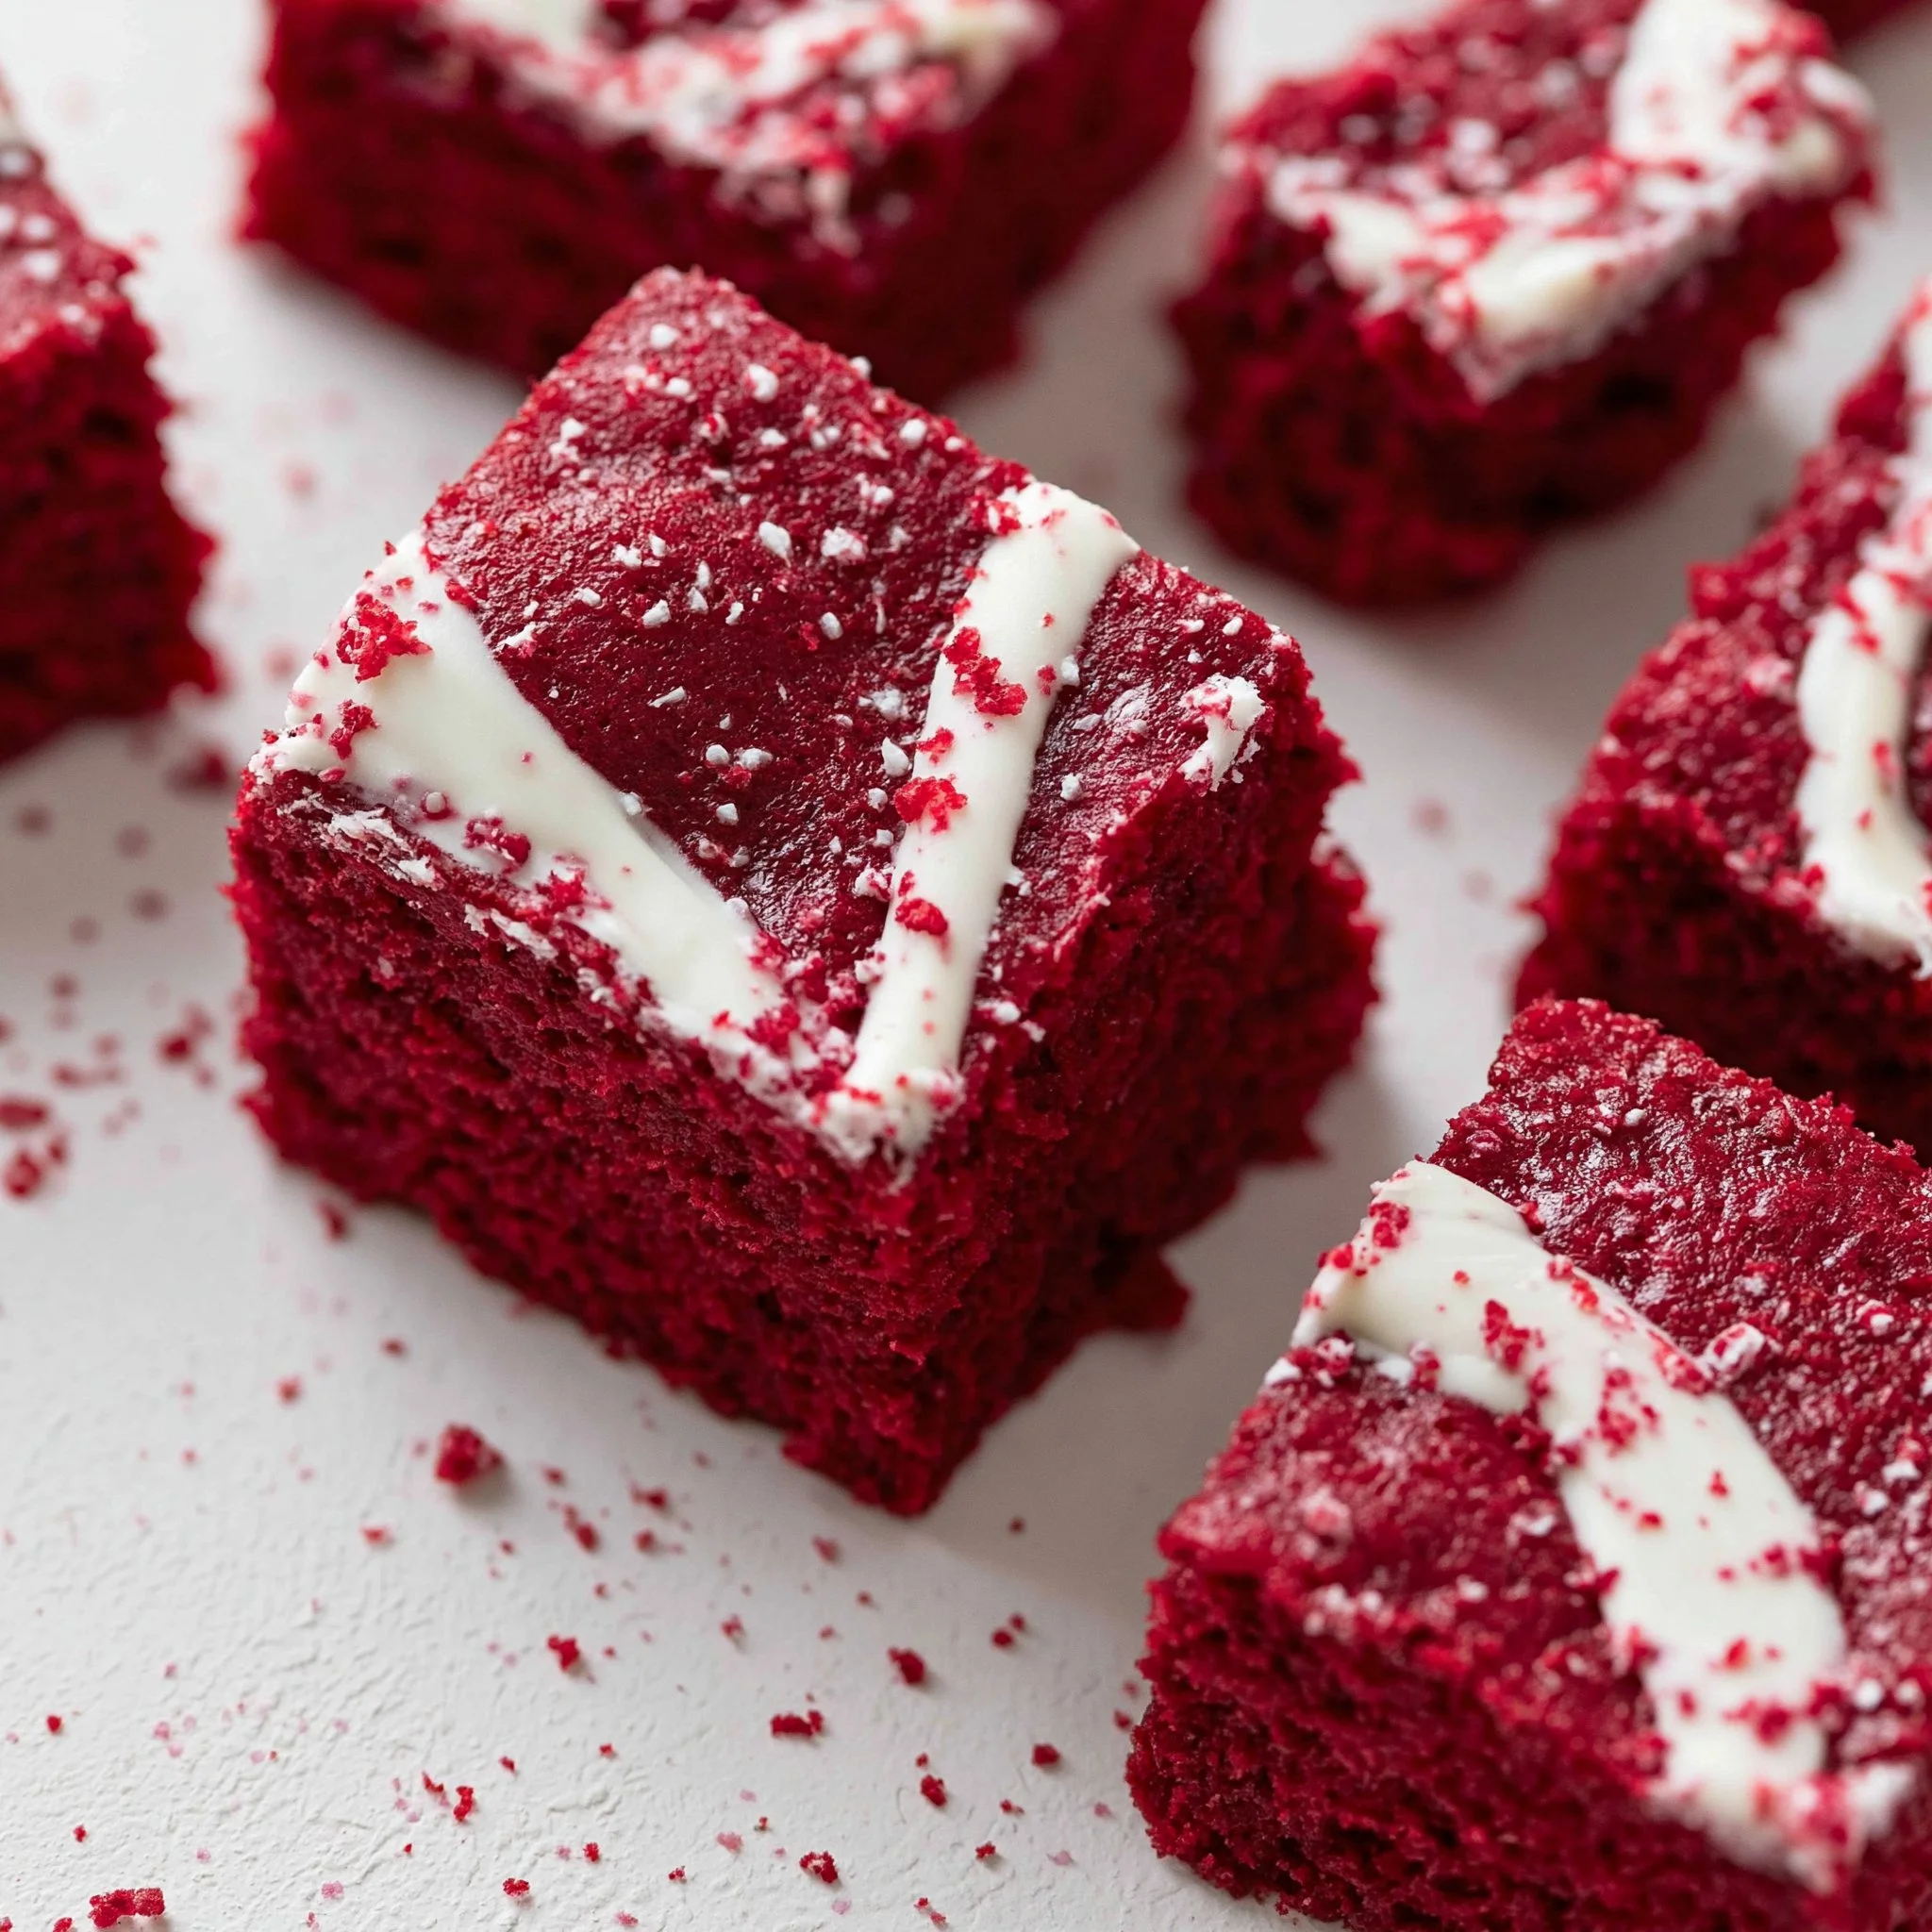
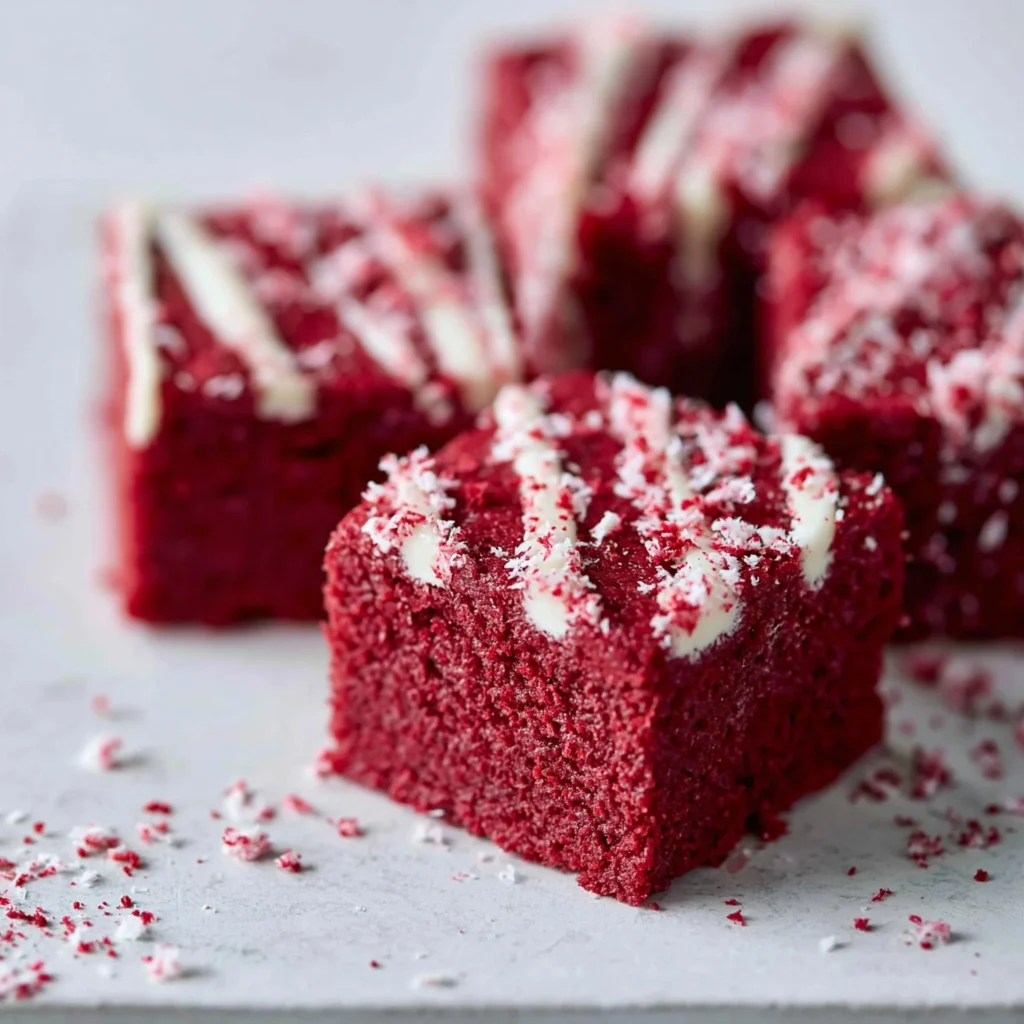
The moment you stir red gel coloring into the glossy chocolate-butter mixture, you can tell these brownies are going to be something special—deep ruby batter, shiny on top, and thick enough to mound in the pan. They bake up with that classic brownie chew around the edges and a fudgy, cocoa-kissed center that stays moist for days.
I make these when I want red velvet vibes without making a whole cake (and without dirtying a mixer). If you’re planning a cozy dessert spread, they’re right at home next to something breakfasty like 3-ingredient banana oatmeal pancakes the next morning—because yes, leftover brownies absolutely count as a treat with coffee.
Why You’ll Love This Recipe
- One-bowl, microwave melt method: Butter and chopped semi-sweet chocolate melt together quickly in 30-second bursts—no stovetop, no fuss.
- True brownie texture: A tight crumb with fudgy moist crumbs when you test the center (not cakey, not dry).
- Red velvet flavor without being overly chocolatey: Just 2 tablespoons cocoa powder gives a gentle cocoa depth that lets vanilla shine.
- That subtle red velvet tang: 1 teaspoon white vinegar adds the classic faint tang and rounds out the sweetness.
- Optional white chocolate moment: Fold in chips for little creamy pockets, or drizzle melted white chocolate for a clean bakery-style finish.
The Story Behind This Recipe
I wanted a red velvet brownie that looked boldly red and still tasted like a brownie—so I kept the cocoa light, leaned on vanilla, and used a small amount of chopped semi-sweet chocolate for richness and shine. The vinegar and gel coloring do the quiet work here: they make the flavor feel “red velvet” and the color pop without watering down the batter.
What It Tastes Like
These taste like a vanilla-forward brownie with a soft cocoa backbone—sweet, buttery, and slightly tangy in that unmistakable red velvet way. The top gets that thin, glossy brownie skin, and the center stays dense and fudgy with a gentle chew. If you add white chocolate chips, you’ll get creamy little bursts that balance the cocoa and make each bite feel extra plush.
Ingredients You’ll Need
A few details matter here: melted butter plus chopped semi-sweet chocolate gives you a glossy, rich base, while gel food coloring keeps the batter thick (liquid coloring can thin it out). The vinegar is small but important—it nudges the flavor toward classic red velvet. For the prettiest squares, line your pan with parchment so you can lift the slab out cleanly; if you’re into neat edges and clean cuts, you’ll love that trick as much as I do when serving alongside easy weekend breakfast favorites the next day.
- 3/4 cup unsalted butter (melted)
- 2 oz chopped semi-sweet chocolate bar
- 1 & 1/4 cup granulated sugar
- 2 large eggs
- 2 teaspoon vanilla extract
- 1 teaspoon white vinegar
- 1/2 tablespoons red gel food coloring
- 2 tablespoons unsweetened cocoa powder
- 1 & 1/4 cup all-purpose flour
- 1/4 teaspoon salt
- 1/2 cup white chocolate chips (optional mixed in the the batter or melted and drizzled on top of the brownies.)
How to Make Red Velvet Brownies
- Prep the pan and oven. Preheat your oven to 350°F. Line an 8×8-inch baking pan with parchment paper, leaving a little overhang so you can lift the brownies out later.
- Melt butter + chocolate until smooth. In a large microwave-safe mixing bowl, microwave the melted butter and chopped semi-sweet chocolate in 30-second increments, stirring well each time. Stop when it’s fully melted and looks smooth and glossy (no chocolate streaks).
- Build the batter base. Stir in the granulated sugar until combined. Add the eggs one at a time, beating well after each—your mixture should look a bit thicker and shinier as the eggs blend in.
- Add flavor + color. Stir in the vanilla extract, white vinegar, and red gel food coloring. The batter should turn a vivid red and stay thick (gel color helps keep that consistency).
- Whisk the dry ingredients separately. In a separate bowl, sift together the cocoa powder, flour, and salt to break up any cocoa lumps—this keeps the crumb even and prevents bitter pockets.
- Combine—gently. Gradually add the dry ingredients to the wet ingredients and mix just until you don’t see dry flour anymore. Don’t overmix; stopping early is how you keep the brownies fudgy instead of tough.
- Optional: add white chocolate chips. If using, fold in the white chocolate chips until they’re evenly scattered.
- Bake. Pour the batter into the prepared pan and spread it evenly (it’ll be thick). Bake for 30–35 minutes, until a toothpick inserted in the center comes out with a few moist crumbs—not wet batter. (If it’s totally clean, you may be past fudgy territory.)
- Cool completely before slicing. Let the brownies cool all the way in the pan. This is when the center sets and the top finish firms up, making cleaner cuts.
- Optional white chocolate drizzle. Melt white chocolate chips and drizzle over the cooled brownies. Let it set, then slice into squares.
Tips for Best Results
- Use gel food coloring for the boldest red. It gives you that deep red velvet color without thinning the batter (thinner batter can bake up flatter and less fudgy).
- Don’t rush the melt. Microwave in short bursts and stir well—overheating chocolate can make it grainy, while gentle melting keeps it silky and shiny.
- Stop mixing as soon as the flour disappears. Overmixing develops gluten and can make the brownies more bread-like; you want dense, tender chew.
- Aim for “moist crumbs,” not a clean toothpick. A few sticky crumbs mean the center will settle into that fudgy texture as it cools.
- Cool completely for clean slices. Warm brownies are delicious, but they’ll cut messy; fully cooled brownies lift and slice neatly (especially helpful if you’re packing them up with grab-and-go breakfast treats for the next day).
Variations and Substitutions
- White chocolate chips: Mix them into the batter for creamy pockets, or melt and drizzle on top for a clean, pretty finish—either way works with the same ingredient.
- Deeper color: If you want a more dramatic red, you can slightly increase the gel coloring, but add a little at a time so you don’t overshoot the shade you like.
How to Serve It
- Serve at room temperature for the best chewy-fudgy contrast (edges a little firmer, center plush).
- For a simple finish, go with the white chocolate drizzle—it sets into sweet ribbons that look especially good against the red crumb.
- Cut into small squares for a dessert board, or bigger squares when you want full brownie heft with a mug of coffee (and maybe something cozy for the breakfast table tomorrow).
How to Store It
- Room temperature: Store cooled brownies in an airtight container; they stay moist and chewy for a few days.
- If you drizzle white chocolate: Let the drizzle set completely before stacking, or place parchment between layers to keep the tops neat.
- Make-ahead friendly: These are even easier to slice once they’ve had time to fully cool and settle, so baking them a day ahead works beautifully.

Final Thoughts
If you love the look and vibe of red velvet but crave a true brownie bite, this is the sweet spot: glossy top, fudgy center, and just enough cocoa to keep things rich without drowning out the vanilla. Keep the toothpick test to “moist crumbs,” let them cool, and you’ll get clean, bakery-style squares every time.
Conclusion
If you’re in the mood to compare red velvet brownie styles, I also like browsing Red Velvet Brownies – Eats Delightful for another take, checking out the swirl-worthy idea behind Red Velvet Cheesecake Brownies – Pretty. Simple. Sweet., and flipping through Red Velvet Brownies Recipe – Soulfully Made when I want to see how other bakers dial in color and fudginess.
Red Velvet Brownies
Ingredients
Method
- Preheat your oven to 350°F and line an 8x8-inch baking pan with parchment paper.
- In a large microwave-safe bowl, melt the butter and chopped chocolate in 30-second increments until smooth.
- Stir in the granulated sugar until combined.
- Add the eggs one at a time, beating well after each addition.
- Stir in the vanilla extract, white vinegar, and red gel food coloring until vibrant.
- In a separate bowl, sift together cocoa powder, flour, and salt.
- Gradually add the dry ingredients to the wet ingredients and mix until just combined.
- Pour the batter into the prepared pan and spread evenly.
- Bake for 30–35 minutes, until a toothpick in the center comes out with a few moist crumbs.
- Allow to cool completely in the pan before slicing.
- Optional: Melt white chocolate chips and drizzle over the cooled brownies.