
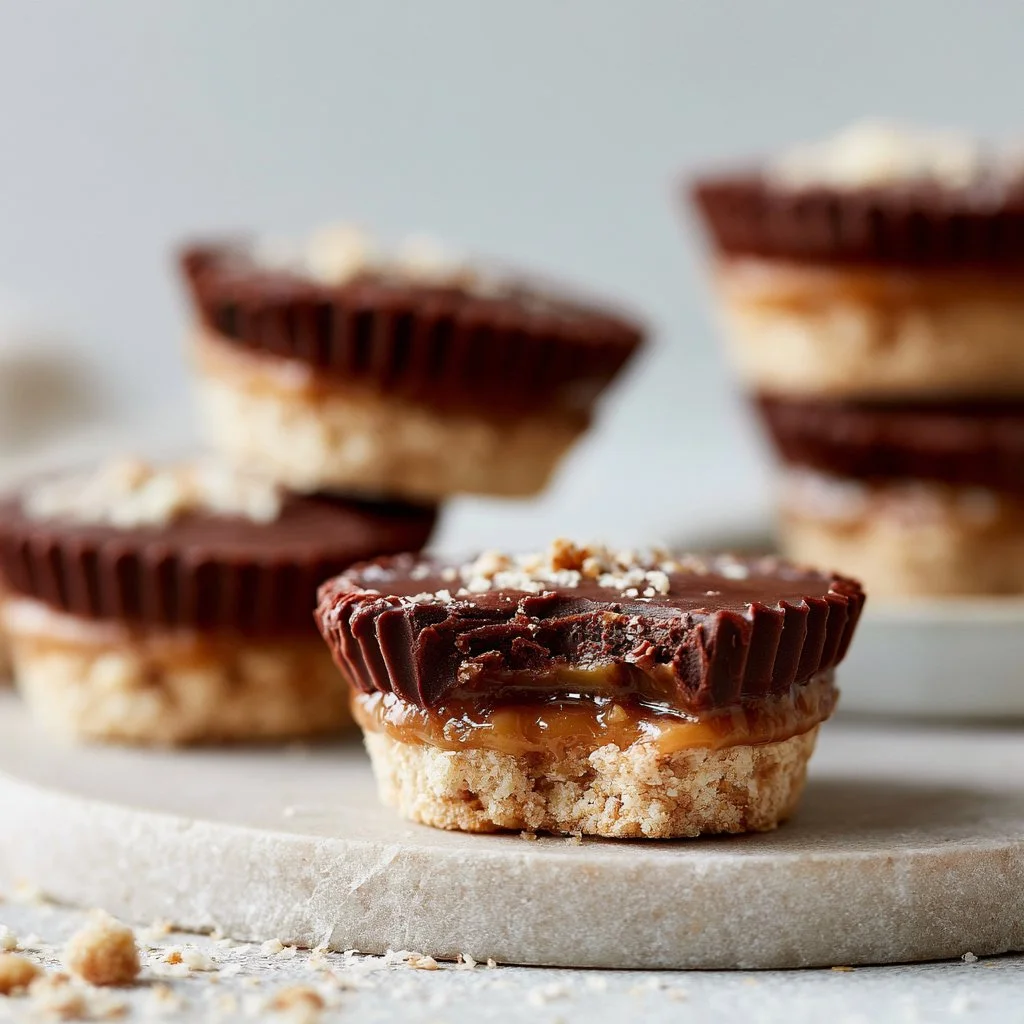
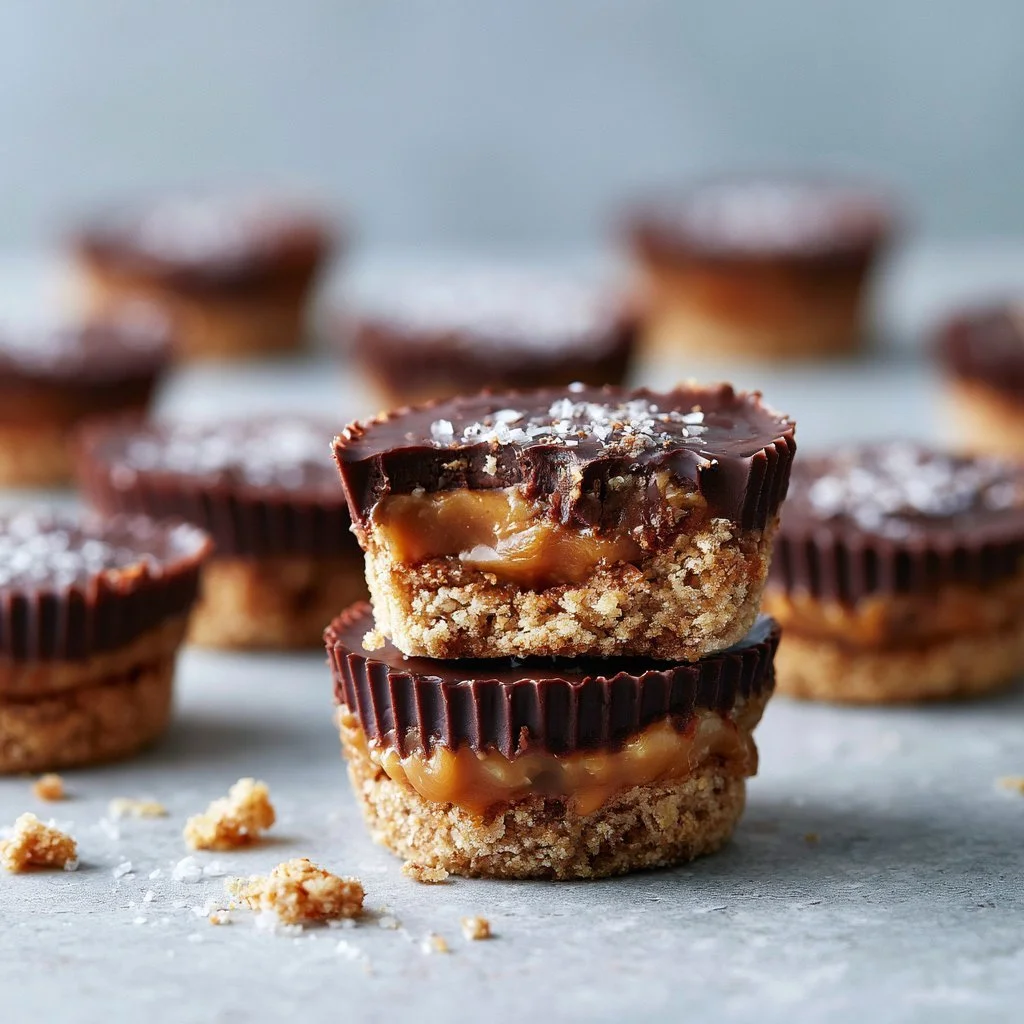
Healthy Twix Cups are a delightful treat that marries the sweetness of chocolate with the wholesome goodness of natural ingredients. Each bite is a satisfying explosion of flavors, featuring a creamy caramel layer nestled between a sturdy cookie base and a luscious dark chocolate coating. The results are not only gorgeous to look at but also leave you feeling guilt-free, as these cups are made with nourishing ingredients. You may also find Healthy Banana Brownies useful.
You’ll love how easy and quick these treats are to make. As they set in the fridge, you can enjoy the comforting aroma of chocolate wafting through your kitchen, which is hard to resist. These cups are perfect for satisfying your sweet tooth without compromising on health. You may also find Healthy Chocolate Peanut Butter No Bake Oatmeal Cookies useful.
Why You’ll Love This Recipe
- The rich contrast between the creamy caramel and dark chocolate creates an irresistible flavor experience.
- A smooth, sticky cookie base provides the perfect foundation, making each bite chewy and satisfying.
- Made with wholesome ingredients, you can enjoy this treat without any guilt.
- They can be prepared ahead of time and stored, making them a convenient snack for busy days.
- The recipe allows for slight variations, such as using different nut butters or adding your favorite toppings.
- Presentation-wise, these cups look stunning and make great homemade gifts or party treats.
The Story Behind This Recipe
This recipe was inspired by the classic Twix bars, but with a healthy twist. Replacing traditional sugary ingredients with wholesome alternatives not only enhances the flavor but makes each cup a satisfying option for those craving something sweet without the added sugars and preservatives.
What It Tastes Like
These Healthy Twix Cups have a beautiful balance of sweetness from the maple syrup and dates, nicely contrasted by the rich bitterness of dark chocolate. The texture is a delightful combination of chewy caramel and crunchy cookie, all complemented by a smooth melt-in-your-mouth chocolate layer. Each bite leaves you feeling indulgent yet refreshed.
Ingredients You’ll Need
For these Twix Cups, the almond flour provides a nutty base that is both gluten-free and nutritious. Coconut oil adds a richness, while maple syrup and dates offer natural sweetness, making for a satisfying dessert without the need for refined sugars. You’ll also enjoy the creamy texture of nut butter and coconut milk, which elevates the caramel filling. The following is the complete list of ingredients you’ll need:
- 1 cup almond flour
- 1/4 cup coconut oil
- 1/4 cup maple syrup
- 1/2 cup pitted dates
- 1/4 cup nut butter (e.g., almond or peanut)
- 1/4 cup coconut milk
- 1 cup dark chocolate chips
- Sea salt (optional, for topping)
How to Make Healthy Twix Cups
- In a mixing bowl, combine the almond flour, melted coconut oil, and maple syrup. Stir until well blended to form a sticky cookie base that holds together when pressed.
- Firmly press this mixture into the bottom of muffin cups or a suitable mold to create an even layer that will serve as the base.
- For the caramel layer, blend the pitted dates, nut butter, and coconut milk until smooth and creamy. Pour this mixture evenly over the cookie base, ensuring it covers the base entirely.
- In a microwave-safe bowl, melt the dark chocolate chips in 30-second increments, stirring in between to achieve a completely smooth consistency. Pour the melted chocolate over the caramel layer, making sure to cover it thoroughly.
- Place the cups in the refrigerator for 1-2 hours or until set. The chocolate should be firm to the touch and not sticky.
- Once set, carefully remove the cups from the molds. If desired, sprinkle a hint of sea salt on top for added flavor. Enjoy your Healthy Twix Cups!
Tips for Best Results
- Ensure that your dates are soft; if they’re a bit stale, soak them in warm water for 10 minutes to soften.
- To make clean removal from the molds easier, line them with mini cupcake liners or grease them lightly with coconut oil.
- Be patient while melting the chocolate, ensuring to stir it between intervals; this prevents burning and achieves a glossy finish.
- Allow the Twix Cups to chill completely in the fridge before serving for the best texture and flavor.
Variations and Substitutions
Feel free to use sunflower seed butter instead of almond or peanut butter for those with nut allergies. If you prefer a deeper flavor, try using dark chocolate with a higher cocoa percentage. For added texture, consider sprinkling in some crushed nuts before pouring the chocolate layer on.
How to Serve It
Serve your Healthy Twix Cups chilled for the best flavor experience. They are perfect on their own or paired with fresh fruit like strawberries or raspberries for a vibrant contrast. A dollop of coconut whipped cream on the side can also elevate the experience.
How to Store It
Store these cups in an airtight container in the refrigerator for up to a week. You can also freeze them for a longer shelf life. Simply freeze them in a single layer, then transfer to a zip-top bag, allowing you to enjoy these delicious treats any time you crave something sweet.

Final Thoughts
I invite you to try making these Healthy Twix Cups! They’re not only simple to prepare, but they also deliver on flavor and satisfaction. When you take that first bite, you’ll be glad you made them!
Conclusion
If you’re looking for more treats that balance health with indulgence, you might also enjoy making Healthy Twix Cups (Vegan), or explore Healthy Vegan Twix Cups (paleo) for a different twist. For a more bite-sized option, check out Bite-Sized Twix Cups to satisfy your cravings!
Healthy Twix Cups
Ingredients
Method
- In a mixing bowl, combine the almond flour, melted coconut oil, and maple syrup until well blended to form a sticky cookie base.
- Firmly press this mixture into the bottom of muffin cups or a suitable mold to create an even layer.
- For the caramel layer, blend the pitted dates, nut butter, and coconut milk until smooth and creamy, then pour evenly over the cookie base.
- In a microwave-safe bowl, melt the dark chocolate chips in 30-second increments, stirring until smooth. Pour melted chocolate over the caramel layer.
- Place the cups in the refrigerator for 1-2 hours or until set.
- Once set, remove the cups from the molds, and sprinkle sea salt on top if desired.
- Serve chilled, possibly with fresh fruit or coconut whipped cream.